RabbitMQ Configuration In Spring Boot With Examples
Learn how to integrate RabbitMQ with Spring Boot application to enable asynchronous communication in microservices architecture.
Munaf Badarpura
July 20, 2025
5 min read
If you are building microservices, you have probably heard the term message queue. and it is important for handling communication between services efficiently. Instead of making one service wait for another, messaging lets them talk asynchronously. That is where RabbitMQ comes in, It is one of the most popular open-source message brokers.
In this article, I will show you how to integrate RabbitMQ with a Spring Boot application using simple and clear examples.
Introduction#
- In modern applications we use microservices architecture, As application grows the connections between these services become large.
- We can’t rely on request/response-based systems in this situation since applications usually wait for another service’s response.
- All these factors create a need for asynchronous communication between the microservices, and Message Based Systems can help.
- A new component called an intermediary is introduced to communication between two services instead of directly establishing communication between them.
- This middle component is known as Message Broker.
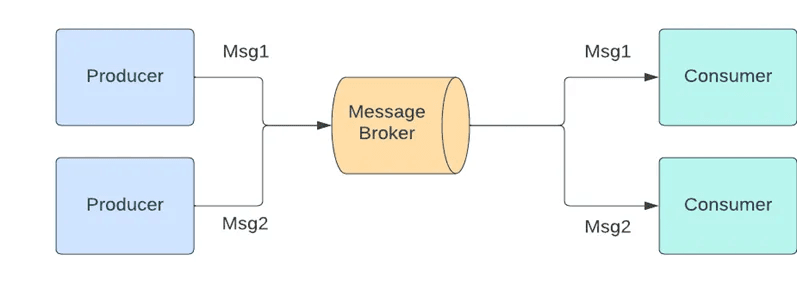
- Instead of every service trying to understand how to talk to every other service, they all just talk to the message broker using a common format.
- Message Brokers can also store (queue) messages temporarily. This means if a service is busy or slow, it won’t block others — the message just waits in line. This helps things run faster overall.
- For example, when a user sends a request that needs a lot of processing, the web server can quickly reply and let another worker handle the heavy task in the background.
RabbitMQ#
- RabbitMQ is an popular open-source Message Broker used for building message-based systems. Although RabbitMQ supports multiple protocols, the most commonly used is AMQP.
- AMQP 0–9–1 (Advanced Message Queuing Protocol) is a messaging protocol.
- It works at the application layer and sends data in binary format, which is more efficient than plain text. In AMQP, the data is broken into frames, which are like small packets that carry information between apps and the message broker.
Key Components#
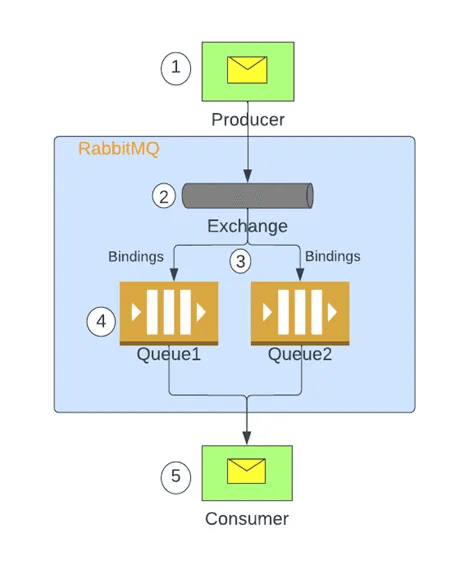
● Producer / publisher: Application that sends the messages.
● Consumer / subsciber: Application that receives the messages.
● Queue: A place where messages are stored until a service (consumer) picks them up.
● Connection: A TCP connection between producer and consumer and the RabbitMQ server.
● Channel: A lightweight communication path inside a connection. You publish or consume messages using channels.
● Exchange: It decides where to send a message. Producers send messages to an exchange, and it routes them to the right queue(s) based on rules.
● Binding: Bindings are rules that exchanges use to route messages to queues.
● Routing key: A key that the exchange uses to decide how to route the message to queues. Think of the routing key as an address for the message.
Steps To Add RabbitMQ In Spring Boot :#
Let’s build two Spring Boot services: a producer to send email messages and a consumer to process them. We’ll use RabbitMQ to handle the communication. Ready? Here we go!
Step 1: Run RabbitMQ with Docker#
The easiest way to start RabbitMQ is with Docker. Open your terminal and run:
Step 2: Add This Dependency In Your Spring Boot Project#
Add this to the pom.xml for both projects:
Step 3: Configure RabbitMQ in application.yml#
Step 4: Set Up Exchange, Queue, and Binding#
Create a configuration class in both services to define the queue, exchange, and binding:
- What’s happening?
- Creates a durable queue (
email-queue) that survives RabbitMQ restarts. - Sets up a topic exchange (
email-exchange). - Binds the queue to the exchange with the routing key
email-routing-key.
- Creates a durable queue (
Step 5: Create the Producer#
In the producer service, create a service to send messages:
This sends a message to the email-exchange, which routes it to the email-queue.
Step 6: Create the Consumer#
In the consumer service, create a listener to process messages:
- What’s happening?
- The
@RabbitListenerlistens for messages onemail-queue. - When a message arrives, it’s passed to
emailService.sendEmail()(you’d implement this for actual email sending).
- The
Step 7: To Send JSON Messages#
To send JSON instead of plain strings, add this bean to RabbitMqConfig in both services:
This lets you send and receive JSON objects for more complex data.
Step 8: Test It#
- Start RabbitMQ with the Docker command.
- Run both Spring Boot apps.
- In the producer, call
messagePublisher.sendEmail("Test email!"). - Check the consumer’s console for the message.
Visit http://localhost:15672 to see messages flowing through the queue in the RabbitMQ dashboard. It’s like watching your app’s mailroom in action!
Conclusion#
By adding RabbitMQ to your Spring Boot apps, you introduce a robust and scalable way to manage inter-service communication. It decouples services, improves responsiveness, and gives you more control over message delivery.
Want to Master Spring Boot and Land Your Dream Job?
Struggling with coding interviews? Learn Data Structures & Algorithms (DSA) with our expert-led course. Build strong problem-solving skills, write optimized code, and crack top tech interviews with ease
Learn more

