Kubernetes ReplicaSets and Deployments
Alright, picture this: you’ve got your shiny new app running in a Kubernetes cluster, neatly organized in namespaces (if you read my last blog, you’re already a namespace ninja 😎). But then, traffic spikes, or a container crashes, and you’re scrambling to keep things running. Sound familiar? I’ve been there, and let me tell you, Kubernetes ReplicaSets and Deployments are your secret weapons for keeping your apps stable, scalable, and ready for anything. In this blog, we’re diving deep into these core Kubernetes concepts, breaking them down so even beginners can feel like pros.
Here’s the thing: ReplicaSets and Deployments are like the stage managers of your Kubernetes show. They make sure the right number of containers are performing, handle updates without missing a beat, and keep the show going if something flops. By the end of this post, you’ll know how to use Kubernetes ReplicaSets and Deployments to scale your apps, roll out updates, and recover from failures.
What Are ReplicaSets?#
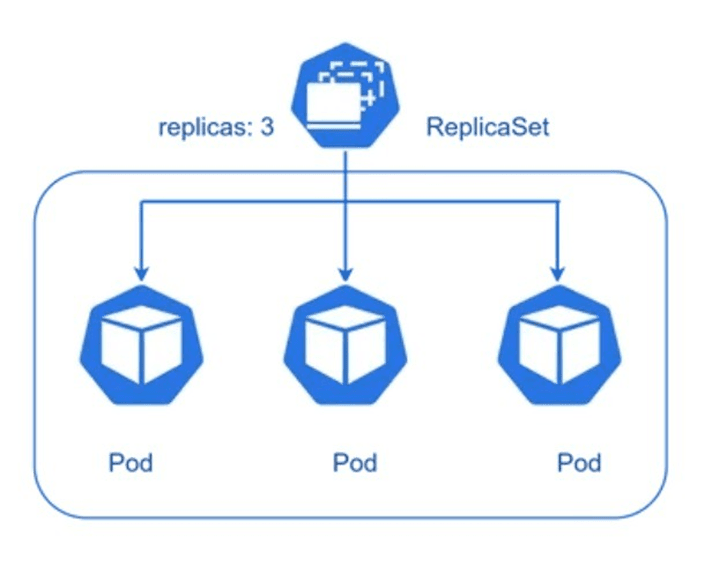
Let’s start with ReplicaSets, the unsung heroes of Kubernetes scaling. A ReplicaSet ensures that a specified number of Pod replicas are running at all times. Think of it as a babysitter for your Pods, constantly checking that the right number are up and healthy. If a Pod crashes or a node fails, the ReplicaSet swoops in to replace it. If you scale up, it spins up more Pods to match.
Why Do You Need ReplicaSets?#
When I first started with Kubernetes, I thought, “Why can’t I just run a single Pod and call it a day?” Oh, rookie me. 😅 Pods are fragile—they can die if a node crashes, traffic spikes, or someone accidentally deletes them. ReplicaSets solve this by:
- Maintaining Desired State: Ensuring the exact number of Pods you want are running.
- Self-Healing: Automatically replacing failed Pods.
- Scaling: Adding or removing Pods to handle load changes.
Example 1: A Simple ReplicaSet
Imagine you’re running a web app that needs three identical Pods to handle traffic. You create a ReplicaSet to enforce this. Here’s the YAML:
Apply it with:
Output:
Check the Pods:
Output:
The ReplicaSet created three Pods, each running the nginx container. If you delete one (say, kubectl delete pod web-app-rs-abc12 -n dev-namespace), the ReplicaSet notices and spins up a new Pod to maintain the replicas: 3 count. Magic, right?
Enter Deployments: The Big Boss#
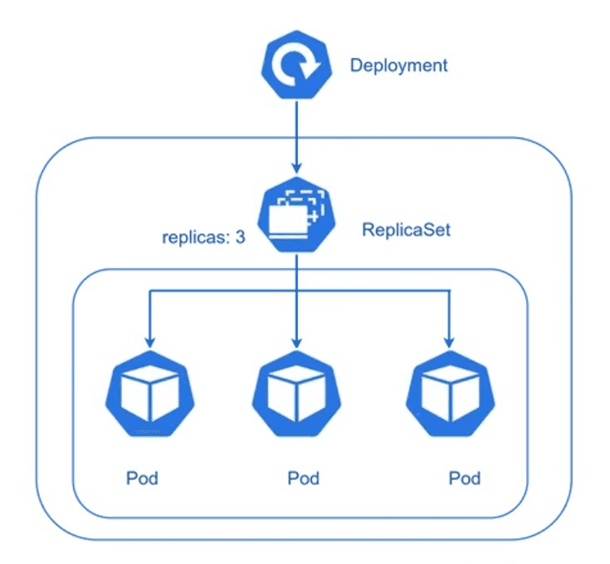
Now, ReplicaSets are awesome, but they’re like a trusty assistant who only handles Pod counts. What if you need to roll out a new app version or scale dynamically? That’s where Deployments come in, taking Kubernetes ReplicaSets and Deployments to the next level. A Deployment is a higher-level resource that manages ReplicaSets, adding features like rolling updates, rollbacks, and scaling with ease.
Think of a Deployment as a movie director. It tells the ReplicaSet (the assistant) how many Pods to run, coordinates updates, and ensures the show goes on without interruptions. Deployments are the go-to for most apps because they’re flexible and powerful.
Why Use Deployments?#
Deployments build on ReplicaSets to offer:
- Rolling Updates: Update your app to a new version without downtime.
- Rollbacks: Revert to a previous version if something goes wrong.
- Scaling: Adjust the number of Pods on the fly.
- Self-Healing: Inherit ReplicaSet’s ability to replace failed Pods.
Example 2: Creating a Deployment
Let’s deploy that same web app, but this time with a Deployment. Here’s the YAML:
Apply it:
Output:
Check the Pods:
Output:
The Deployment created a ReplicaSet behind the scenes, which then created three Pods. You can verify this with:
Output:
Rolling Updates and Rollbacks#
Here’s where Deployments really shine: rolling updates and rollbacks. Let’s say you want to update your app to nginx:1.16. You don’t want downtime, and you definitely don’t want to break things. Deployments let you control how updates happen using the strategy field, and Kubernetes offers two strategy types: RollingUpdate and Recreate. Let’s break them down.
Strategy 1: RollingUpdate (The Smooth Operator)#
The RollingUpdate strategy is the default, and it’s all about keeping your app available during updates. It gradually replaces old Pods with new ones, ensuring some Pods are always running. You can fine-tune it with two key settings:
- maxSurge: The maximum number (or percentage) of extra Pods allowed during the update (above the desired replicas count). Think of it as hiring temporary workers to speed up the transition.
- maxUnavailable: The maximum number (or percentage) of Pods that can be unavailable during the update (below the desired replicas count). This ensures a minimum number of Pods keep serving traffic.
Example 3: RollingUpdate with maxSurge and maxUnavailable
Let’s update our web-app-deployment to use nginx:1.16 with a RollingUpdate strategy. Here’s the YAML:
Apply it:
Output:
What’s happening here? With replicas: 3, maxSurge: 1, and maxUnavailable: 1:
- maxSurge: 1 means Kubernetes can create one extra Pod (so up to 4 Pods total) during the update.
- maxUnavailable: 1 means at most one Pod can be unavailable, so at least 2 Pods are always running.
Kubernetes will:
- Create one new Pod with
nginx:1.16(4 Pods total: 3 old, 1 new). - Wait for the new Pod to be ready.
- Terminate one old Pod (back to 3 Pods: 2 old, 1 new).
- Repeat until all Pods are updated.
Check the rollout status:
Output:
You can watch the Pods during the update:
Sample Output (during update):
If the update goes haywire (say, nginx:1.16 is buggy), you can roll back:
Output:
This reverts to the previous ReplicaSet, bringing back nginx:1.14. No downtime, no stress!
Why Use maxSurge and maxUnavailable?#
I’ll be honest—when I first saw these settings, I thought, “Why bother? Just update everything!” But after a botched update took down a test app (oops 😬), I learned their value. maxSurge and maxUnavailable let you control the update’s speed and stability. For example, setting maxSurge: 25% and maxUnavailable: 25% (percentages are also valid) is great for large clusters, while maxSurge: 1 and maxUnavailable: 0 is super cautious for critical apps.
Strategy 2: Recreate (The Clean Slate)#
The Recreate strategy is the opposite of RollingUpdate. It kills all old Pods before creating new ones, causing a brief downtime. It’s like demolishing a house and rebuilding it—you get a fresh start, but no one can live there during construction.
When to use Recreate:
- Apps where downtime is okay (e.g., batch jobs, internal tools).
- Updates where old and new versions can’t coexist (e.g., major database schema changes).
Example 4: Recreate Strategy
Let’s update the same Deployment using Recreate. Here’s the YAML:
Apply it:
Output:
What happens? Kubernetes:
- Terminates all 3 old Pods (nginx:1.14).
- Creates 3 new Pods (nginx:1.16) once the old ones are gone.
You’ll see a brief downtime (no Pods running) during the switch. Check the Pods:
Sample Output (during update):
I’ll be honest—when I first tried Recreate, I panicked seeing all Pods terminate at once. 😬 But for non-critical apps, it’s a clean way to ensure no old Pods linger.
Which Strategy Should You Choose?#
Here’s the deal: use RollingUpdate for most apps, especially user-facing ones, because it minimizes downtime. Tune maxSurge and maxUnavailable to balance speed and stability. Use Recreate only when you’re okay with downtime or need a hard reset (e.g., incompatible versions). Always test updates in a non-production environment first!
Scaling with Deployments#
Scaling is a breeze with Kubernetes ReplicaSets and Deployments. Need more Pods to handle a traffic spike? Just tell the Deployment to increase the replicas count.
Manual Scaling#
To scale our web-app-deployment to 5 Pods:
Output:
Check the Pods:
Output:
Autoscaling (Sneak Peek)#
For dynamic scaling, you can use the Horizontal Pod Autoscaler (HPA), which adjusts replicas based on CPU or memory usage. Here’s a quick example:
This ensures 3–10 Pods, scaling up if CPU usage hits 80%. Pretty slick, huh?
Common Misconceptions#
Let’s clear up a couple of things I totally got wrong when I started. 😬
- “ReplicaSets are enough—why bother with Deployments?” ReplicaSets are great for maintaining Pod counts, but they don’t handle updates or rollbacks. Deployments manage ReplicaSets for you, making life easier.
- “Rolling updates are always safe.” Not quite! Without proper
strategysettings likemaxSurgeandmaxUnavailable, updates can overwhelm your cluster or cause downtime. Always test in a non-production environment first.
Best Practices for ReplicaSets and Deployments#
To rock Kubernetes ReplicaSets and Deployments, keep these tips in mind:
- Use Deployments, Not Raw ReplicaSets: Deployments are more flexible and handle updates. Only use ReplicaSets directly for rare, custom cases.
- Set Resource Limits: Add
resourcesto your Pod spec to prevent Pods from hogging CPU or memory:
- Tune Your Strategy: Use
maxSurgeandmaxUnavailableto balance update speed and stability. For critical apps, trymaxUnavailable: 0to ensure no downtime. - Monitor Rollouts: Use
kubectl rollout statusto ensure updates go smoothly. - Test Rollbacks: Practice rolling back in a test environment so you’re ready for real-world oopsies.
Conclusion#
In this blog, you mastered Kubernetes ReplicaSets and Deployments, learning how they keep your apps running, scaling, and updating like a pro. We covered what ReplicaSets do, how Deployments level up with rolling updates (complete with maxSurge and maxUnavailable magic), and walked through hands-on examples like creating Deployments, tuning update strategies, and scaling Pods. You’re now equipped to handle traffic spikes and roll out updates without breaking a sweat. Don’t worry if it feels like a lot—just play around with a test cluster, and it’ll click!
Next up in our Kubernetes Handbook, we’ll explore Kubernetes Services, where you’ll learn how to expose your apps to the world (or just your cluster) with ClusterIP, NodePort, and LoadBalancer. It’s all about making your apps talk to each other and your users.