Kubernetes Namespaces and Isolation
So, you’re diving into Kubernetes, and things are starting to feel like a sci-fi movie with containers flying everywhere. I get it—I was there too, scratching my head, wondering how to keep all these moving parts organized. 😅 That’s where Kubernetes namespaces come in, acting like the ultimate organizers of your containerized universe. In this blog, we’ll break down what namespaces are, why they’re a game-changer for Kubernetes isolation, and how to use them like a pro. Whether you’re a beginner or just brushing up, I’ve got your back with simple explanations, real-world examples.
Here’s the thing: Kubernetes namespaces are like the folders on your computer, but way smarter. They help you group resources, avoid chaos, and keep your cluster tidy. By the end of this post, you’ll know how to create namespaces, use them for isolation, and dodge common pitfalls. Let’s be real—your first try might be a little messy, and that’s totally okay! Let’s dive in.
What Are Kubernetes Namespaces?#
Picture this: you’re running a Kubernetes cluster with hundreds of containers for different apps—maybe a web app, a database, and a testing environment. Without some kind of organization, it’s like throwing all your clothes, books, and snacks into one giant pile. Good luck finding anything! Kubernetes namespaces are virtual partitions within a cluster that let you group related resources together, keeping things neat and manageable.
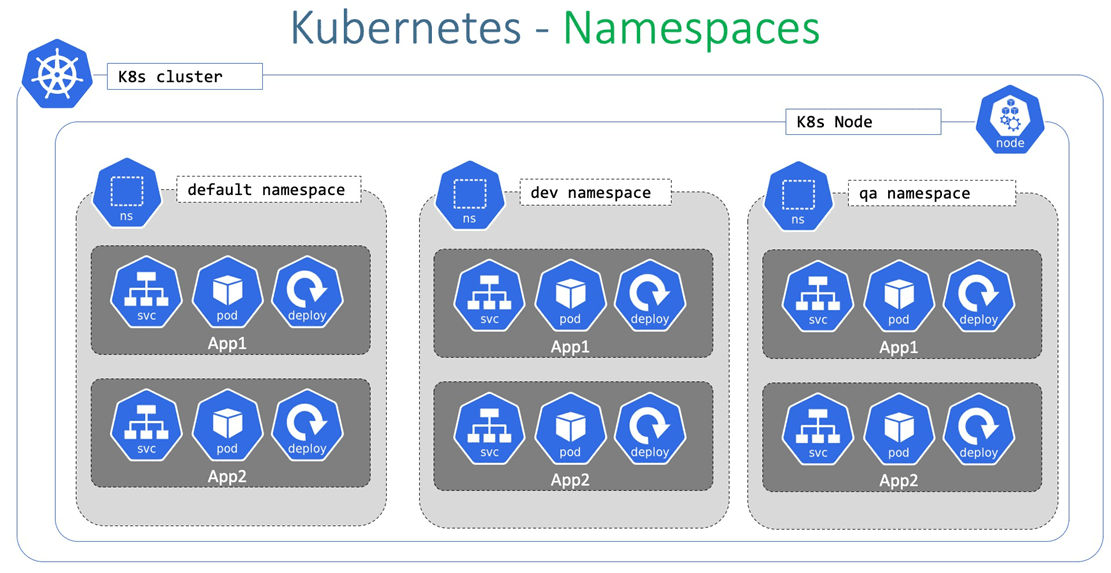
A namespace is like a mini-cluster inside your cluster. It provides a scope for names (so two resources can have the same name in different namespaces) and helps with Kubernetes isolation by separating resources logically. By default, Kubernetes gives you a few namespaces like default, kube-system, and kube-public, but you can create as many as you need.
Why Should You Care?#
Let’s be real—when I first started with Kubernetes, I ignored namespaces, thinking, “Eh, I’ll just dump everything in default.” Big mistake. 😬 Without namespaces, you’re begging for confusion, conflicts, and even security risks. Here’s why namespaces are your new best friend:
- Organization: Group resources by team, project, or environment (e.g.,
prod,dev,test). - Name Uniqueness: Run two Pods named
my-appin different namespaces without clashes. - Isolation: Limit access and resources to specific namespaces for security and efficiency.
- Resource Management: Set quotas to prevent one team from hogging the cluster.
Example 1: Real-World Scenario
Imagine you’re at a company with two teams: Team Awesome (building a web app) and Team Super (running a database). Without namespaces, their Pods, Services, and ConfigMaps could get tangled up. By creating awesome-namespace and super-namespace, each team gets its own sandbox, reducing confusion and making life easier for everyone.
How Do Namespaces Enable Kubernetes Isolation?#
Okay, so namespaces are great for organization, but their real superpower is Kubernetes isolation. Isolation means keeping resources separate so they don’t step on each other’s toes. Think of namespaces as apartment buildings in a city. Each building (namespace) has its own apartments (resources), and tenants (users or apps) can’t just wander into someone else’s place.
Namespaces provide isolation in three key ways:
- Resource Separation: Resources like Pods, Services, and ConfigMaps are scoped to their namespace. A Pod in
devwon’t even know about a Pod inprod. - Access Control: Using Role-Based Access Control (RBAC), you can restrict who can access or modify resources in a namespace.
- Resource Quotas: Set limits on CPU, memory, or the number of Pods per namespace to prevent resource hogging.
Example 2: Access Control with RBAC#
Let’s say Team Awesome only needs access to awesome-namespace. You can create an RBAC Role that grants them permission to manage Pods and Services in that namespace only. Team Super? They’re locked out of awesome-namespace and stick to super-namespace. This setup keeps things secure and prevents accidental (or not-so-accidental) meddling.
Here’s a quick YAML example to create a namespace and an RBAC Role:
Output: After applying this with kubectl apply -f role.yaml, the awesome-namespace is created, and the pod-manager Role allows specific users to manage Pods in that namespace only.
Creating and Using Namespaces#
Now that you’re sold on Kubernetes namespaces, let’s get hands-on. Creating a namespace is super simple, and you can do it with a YAML file or a single kubectl command. Here’s how.
Step 1: Create a Namespace#
You can create a namespace using a YAML file or directly with kubectl. Let’s try both.
YAML Method:
Apply it:
Command-Line Method:
Output:
Step 2: Deploy Resources in a Namespace#
When you create resources like Pods or Services, you can specify their namespace. If you don’t, they go into the default namespace. Let’s deploy a simple Pod in dev-namespace.
Pod YAML:
Apply it:
Output:
To check your Pod:
Output:
Example 3: Multiple Environments
Say you’re testing an app in dev-namespace and running it in prod-namespace. You can deploy the same Pod YAML in both namespaces (just change the namespace field). The Pods won’t conflict because namespaces keep them isolated. This is perfect for testing new features without messing up production.
Pro Tip: Switching Contexts#
If you’re juggling multiple namespaces, use kubectl config set-context to switch between them easily. For example:
Now, all kubectl commands default to dev-namespace. Trust me, this saves time!
Common Misconceptions About Namespaces#
Let’s clear up a few things you might be thinking about Kubernetes namespaces. I made these mistakes when I started, so I’m spilling the tea to save you some headaches. 😄
- “Namespaces are like separate clusters.” Nope! Namespaces are logical partitions within the same cluster. They share the same physical resources (nodes, storage), but they’re isolated virtually.
- “I don’t need namespaces for small projects.” Even for a tiny cluster, namespaces make your life easier by organizing resources and setting up access control early.
Best Practices for Using Namespaces#
To wrap up, here are some golden rules for rocking Kubernetes namespaces:
- Name Thoughtfully: Use clear names like
prod,dev, orteam-alphato reflect purpose. - Limit Access: Use RBAC to restrict who can touch each namespace.
- Set Quotas: Apply ResourceQuotas to prevent any namespace from hogging resources. Here’s a quick example:
- Monitor Usage: Tools like Prometheus can track resource usage per namespace.
Some common commands you will use frequently#
List Namespaces#
Get all namespaces:
Create and Delete Namespaces#
Create a namespace:
Delete a namespace:
Note:- If you delete the namespace then all the resources (pods, deployments, etc) under the namespace will also get deleted. So never by mistakely delete prod namespace in your organizations kubernetes cluster 😂.
Work with Pods in a Namespace#
List Pods in a specific namespace:
List Pods across all namespaces:
Set the Current Namespace#
Change the active namespace for the current context:
Get Namespace Details#
Describe a namespace:
Edit a namespace:
Get All Resources Across All Namespaces#
Conclusion#
In this blog, you learned all about Kubernetes namespaces and how they bring order to your containerized chaos. We explored what namespaces are, how they enable Kubernetes isolation, and walked through creating and using them with real-world examples. You’re now ready to organize your cluster like a pro, whether you’re managing one app or a dozen teams. Don’t worry if it feels overwhelming at first—you’ll get the hang of it with practice!
Next up in our Kubernetes Handbook, we’ll dive into ReplicaSets and Deployments, where you’ll learn how to scale your apps and keep them running smoothly. Get ready to take your Kubernetes skills to the next level! Until then, try creating a few namespaces in your cluster and see how they simplify your workflow. You got this! 😎