Kubernetes Services: Mastering ClusterIP, NodePort, and LoadBalancer
So, you’ve got your Kubernetes cluster humming along, with Pods happily running in namespaces and Deployments keeping everything scaled and updated (if you’ve been following my Kubernetes Handbook, you’re basically a pro already 😎). But here’s the thing: your apps are like actors on a stage, and without a way to connect them to the audience (or each other), they’re just performing in the dark. That’s where Kubernetes Services come in, acting like the spotlight that makes your apps visible. In this blog, we’re diving into the three main types of Kubernetes Services—ClusterIP, NodePort, and LoadBalancer—and how they help your apps communicate inside and outside your cluster.
When I first tackled Services, I was confused. “Why can’t my Pods just talk to each other directly?” I thought. Spoiler: Pods are flaky, and their IPs change all the time. Services solve this by giving your apps a stable address and routing traffic like a boss. By the end of this post, you’ll know how to use ClusterIP, NodePort, and LoadBalancer to expose your apps, whether it’s for internal cluster chatter or welcoming the whole internet. It might feel tricky at first, but you got this! Let’s dive in.
What Are Kubernetes Services?#
Picture your Kubernetes cluster as a bustling city. Pods are like workers in buildings, constantly moving or being replaced. If you try to send a message to a specific Pod’s IP, it’s like mailing a letter to someone who keeps changing apartments—good luck!. A Kubernetes Service is like a permanent mailbox for your app. It provides a stable IP and DNS name, routing traffic to the right Pods, even as they come and go.
Services work by grouping Pods with a selector (e.g., all Pods with the label app: web-app) and giving them a single entry point. They’re essential for container orchestration, enabling communication between apps (like a frontend talking to a backend) or exposing apps to external users. The three main Service types—ClusterIP, NodePort, and LoadBalancer—each have unique superpowers, and we’ll explore them one by one.
Why Do You Need Services?#
I’ll be honest—when I started with Kubernetes, I tried skipping Services and hardcoding Pod IPs. Big mistake. 😬 Pods are ephemeral (they die and get replaced), and their IPs change. Services save the day by:
- Stable Addressing: Providing a fixed IP and DNS name for your app.
- Load Balancing: Distributing traffic across multiple Pods.
- Flexibility: Supporting internal-only or external access, depending on the Service type.
ClusterIP: The Internal Messenger#
ClusterIP is the default Service type, and it’s perfect for communication inside your cluster. It creates a virtual IP (accessible only within the cluster) that routes traffic to a set of Pods. Think of ClusterIP as an internal phone line—only apps inside the cluster can dial it.
When to Use ClusterIP#
Use ClusterIP when your app needs to talk to another app within the cluster, like a web frontend calling a backend API. It’s not exposed outside the cluster, so it’s secure and efficient.
Example 1: Creating a ClusterIP Service
Let’s say you have a Deployment running three Pods for a backend API with the label app: backend. You want your frontend Pods to call this API. Here’s a ClusterIP Service to make it happen:
Apply it:
Output:
Check the Service:
Output:
The CLUSTER-IP (e.g., 10.96.123.45) is the stable address for your backend. Any Pod in the cluster can reach it on port 80, and the Service forwards traffic to the Pods’ targetPort (8080). If a Pod dies, the Service automatically routes to the remaining healthy Pods. Cool, right?
Real-World Scenario#
Imagine your app has a frontend and a database. The frontend needs to query the database, but the database Pods keep getting replaced. A ClusterIP Service gives the frontend a reliable way to reach the database without worrying about changing IPs.
NodePort: Opening a Window to the Outside#
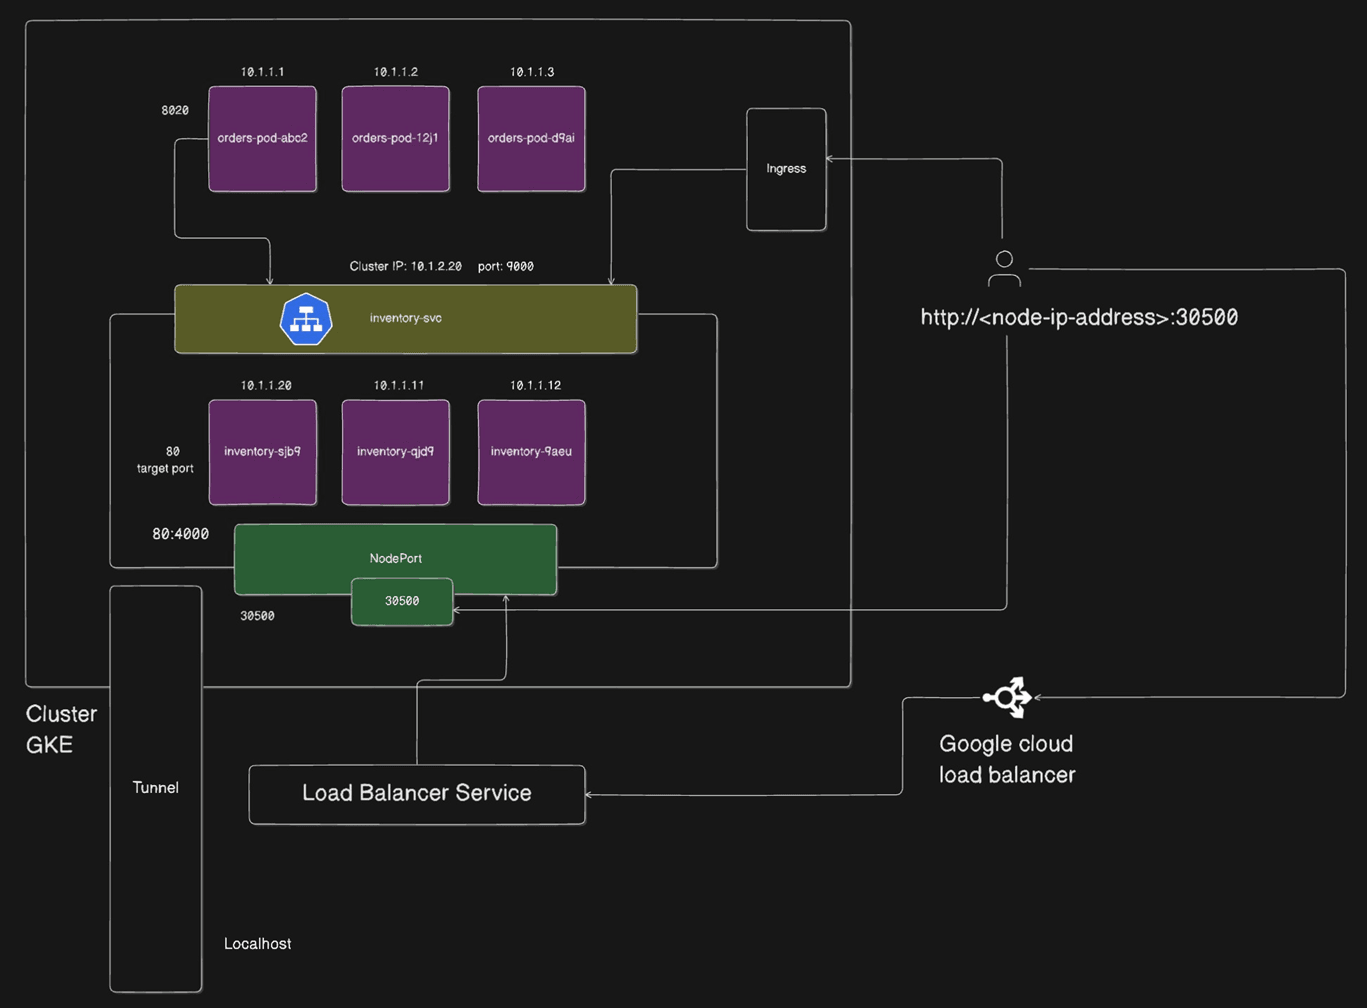
NodePort takes things up a notch by exposing your Service on a specific port of every node in the cluster. It’s like opening a window in your cluster’s wall, letting external traffic peek in. NodePort builds on ClusterIP, so you still get internal access, but you also get a port (in the range 30000–32767 by default) on each node’s IP.

When to Use NodePort#
Use NodePort for testing or when you need external access but don’t have a cloud provider’s load balancer. It’s great for quick demos but less common in production due to security and scalability concerns.
Example 2: Creating a NodePort Service
Let’s expose our backend-service externally using NodePort. Here’s the YAML:
Apply it:
Output:
Check the Service:
Output:
Now, you can access the Service by hitting <node-ip>:30001 from outside the cluster (e.g., http://192.168.1.10:30001). The Service forwards traffic to the backend Pods’ port 8080. If you don’t specify nodePort, Kubernetes picks a random port in the 30000–32767 range.
Pro Tip: Security Warning#
NodePort opens a port on every node, which can be a security risk. I learned this the hard way when I accidentally exposed a test Service to the internet. 😅 Use NodePort sparingly and consider firewall rules to restrict access.
LoadBalancer: The VIP Entrance#
LoadBalancer is the fanciest Service type, designed for production apps that need to handle internet-scale traffic. It integrates with your cloud provider (like AWS, GCP, or Azure) to provision an external load balancer, which routes traffic to your Pods. Think of LoadBalancer as a VIP entrance with a bouncer, directing external users to your app with style.
When to Use LoadBalancer#
Use LoadBalancer when your app needs to be publicly accessible, like a website or API. It’s cloud-dependent, so you’ll need a supported provider. In non-cloud setups (e.g., bare-metal), LoadBalancer might not work without extra tools like MetalLB.
Example 3: Creating a LoadBalancer Service
Let’s expose our backend app to the internet with a LoadBalancer. Here’s the YAML:
Apply it:
Output:
Check the Service:
Output:
The EXTERNAL-IP (e.g., 203.0.113.10) is the cloud load balancer’s address. You can access your app at http://203.0.113.10:80, and the load balancer distributes traffic to your Pods. On cloud providers, this IP is a public, stable address. In local setups like Minikube, you might see <pending> until you configure a workaround.
Choosing the Right Service Type#
Confused about which Service to pick? Here’s a quick guide:
- ClusterIP: Internal communication (e.g., backend to database). Default and secure.
- NodePort: Temporary external access for testing or non-cloud setups. Use cautiously.
- LoadBalancer: Production-grade external access with cloud integration. Best for public apps.
Note:- You can ignore the ingress and Google load balancer in the diagram. We will cover ingress in detail in our upcoming blogs.
When I started, I used NodePort for everything because it was “easy.” Then I realized LoadBalancer was way better for production, and ClusterIP kept my internal apps tidy. 😄 Experiment in a test cluster to find what works for you.
Common Misconceptions#
Let’s clear up a couple of things I got wrong as a Kubernetes newbie:
- “Services are just for external access.” Nope! ClusterIP is all about internal communication, and it’s the most common type.
- “LoadBalancer works everywhere.” Not quite— it’s cloud-specific. In bare-metal clusters, you’ll need extra setup.
Best Practices for Kubernetes Services#
To nail Kubernetes Services, follow these tips:
- Use ClusterIP by Default: It’s secure and perfect for internal traffic.
- Specify Ports Clearly: Match
portandtargetPortto avoid confusion. - Limit NodePort Usage: Restrict node ports with network policies or firewalls.
- Monitor LoadBalancer Costs: Cloud load balancers can get pricey, so check your provider’s pricing.
- Label Selectors: Ensure your Service’s
selectormatches your Pods’ labels exactly.
Conclusion#
In this blog, you mastered Kubernetes Services, unlocking the power of ClusterIP, NodePort, and LoadBalancer to make your apps accessible. We explored how Services provide stable addressing and load balancing, walked through hands-on examples to create each type, and demystified when to use them. You’re now ready to connect your apps inside the cluster or expose them to the world like a container orchestration pro. Don’t stress if it feels like a lot—play with Services in a test cluster, and it’ll click!
Next up in our Kubernetes Handbook, we’ll dive into Service Discovery and DNS Resolution, where you’ll learn how Kubernetes makes it easy for your apps to find and talk to each other using DNS magic. Until then, try creating a ClusterIP or NodePort Service in your cluster and see how your Pods light up.